Snowboard Stance
The binding setup, or stance, of a snowboard offers an endless variation
in binding angles and positions. Most snowboarders have tried a lot of setups
before choosing a particular one. I have written this article with the
intention of giving solid advice and explaining more about the why of
different setups. I have also tried to give the source of particular items
whenever possible -- all the information in this article eventually comes from
magazines, the internet and conversations with experienced- and professional
snowboarders. Unfortunately, there exist many different opinions about
snowboard stances and not one of them seems to prevail. In the end, there is no
"best" setup and it still comes down to personal preference. Hopefully, this
article will at least help you to find a setup that fits you well!
Have fun,
Daan Leijen.
[mail , www]
Disclaimer: Although I have been very careful
with all the provided information, I don't make any claim whatsoever regarding
the accuracy or safety of anything in this article. Any item that may appear to
be offering either medical or legal advice is doing neither.
Stance angles
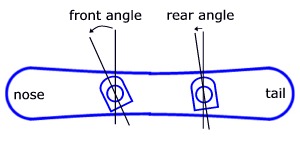
The stance angles are the angles of the bindings with the width of the
board. Normally, you can find these angles on the binding plates. You can
change the angles by unscrewing the binding, turning it and fasten it again.
Some (rental) setups have an easy clip system where you can simply push a
button to change the angles. The angles are normally written like "+21°/+6°",
which means 21 degrees for the front angle and 6 degrees for the back angle.
There is no official way of classifying stance angles, but I think that all
sensible setups can basically be categorized into alpine-, forward-, and duck
stance. The snowboard styles with the alpine- and forward stance are quite
similar, with both knees and the upper body pointing forward. The snowboard
style with duck stance differs from the previous stances, with the rear knee
pointing backwards and the upper body aligned with the board. All styles have
in common that your body (and especially your knees) should always be in a natural
position. For example, the rear angle should never be larger than the front
angle. Needless to say that your knees will have a bad time otherwise. (This
may seem obvious to you but I have seen people off piste with a setup of
+30°/+40° :-)
Alpine stance
This setup is used for alpine
(or race, or carve) boards. These stiff boards are narrow and
have a square tail. These boards are used with hard boots and the stance angles
for this setup are steep: the front and rear angles are anywhere between
+70° and +35° degrees. This style allows for aggressive carving and is thus
well suited for racing contests. The stance on an alpine board is nowadays more
or less determined by the width of the board with respect to your feet (instead
of some fixed angles). In order to maintain good control in short turns, the
difference between the front- and rear angle should be at least 5°.
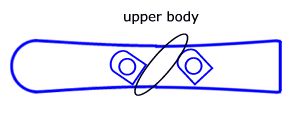
Forward stance
This is the most common stance setup
used on regular freeride- and freestyle boards. The front angle can be between
+40° and +15° degrees and the rear angle anywhere between +30° and 0° degrees.
With the resulting snowboard style, both knees point forward and the shoulders
are aligned with the feet. Anatomically, it is a good idea to make the
difference between the front- and rear angle not too large, say, less than 21°
degrees. A common all-mountain setup is +21° on the front and +6° on the rear.
A common, more carve oriented, stance is +30°/+15° (and some people say that
this is also a good stance for learning snowboarding).
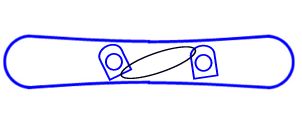
Duck stance
This setup is not so common nowadays
but it is seen frequently in the half-pipe. With duck stance, the front angle
is anywhere between 30° and 0° degrees while the rear angle is negative,
between -1° and -20°. With this snowboard style, the front knee points forward
while the rear knee points backward. The upper body is aligned with the
snowboard. Anatomically, one should keep the difference between both angles
large enough, say, more than 10°, i.e. a 0°/0° degree setup is not very good
for the knees since they are forced to point inward. Common setups are "laid
back" +18°/-6° and "mirror" +15°/-15°.
What angles are right for me?
Alpine boards (with plate bindings)
It is easy if you own an alpine board with hard-boots: use an alpine stance. The
angles on an alpine board are nowadays more or less determined by the width of
your board. A good start setup is to mount the rear binding in such a way that
the toe-side stands slightly out of the board while the heel-side is just on
the edge. This maximizes the pressure that you can exert on the edges of the
board. The front binding is installed with 8° degrees added to the angle of the
rear binding. Later, you can change the angles a little bit to find a stance
that suits you best.
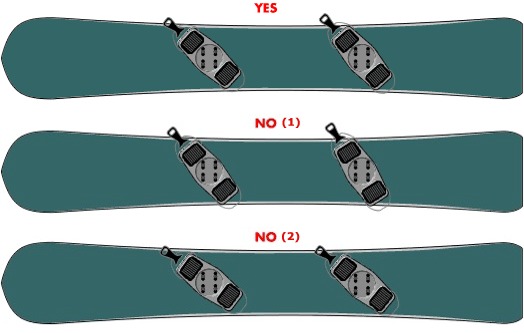
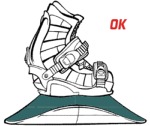
Drawing 1 on the right side shows a setup with not enough angle, especially on
the back foot, which often leads to a spin out during backside turns.
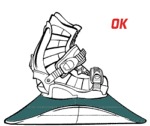
Drawing 2 shows a setup with too much angle. This makes it harder to do fast
transitions in short and medium sized turns.
(drawings by: hot
snowboards)
Regular boards (with soft-boots)
The other 95% of the snowboarders (with soft-boots) should try forward stance or
duck stance. Start with one of the common setups and see what you like the best
(and if you don't like to experiment, just use +21°/+6°). Once you have found a
stance that feels good, you can vary the angles a little bit (±3°) to fine tune
the setup, although it is hard to feel any difference with these small
angles. The most difficult choice is whether to use forward stance or
duck stance since the resulting snowboard style is fundamentally different.
With this choice, we nosedive directly into the endless and almost religious
discussions about ...
To duck or not to duck?
The snowboard styles with forward stance and duck stance differ fundamentally
due to the different alignment of the upper body to the board. Currently, the
forward stance is more commonly used and it is a safe and good choice. A
nice advantage of the forward stance is that you see where you are going
without having to turn your head. With forward stance, you are backed by the
famous Terje Haakonsen (+21°/+9°), who said that this stance is essential to
have stable edge control, and by the 2002 olympic champion Ross Powers who uses
a +21°/+6° setup.
The opinions on duck stance are more controversial. Many experienced
snowboarders that I have talked to, advised against duck stance since they got
knee problems. It is believed that a force that is aligned to the board (for
example, the breaking force of a rock on your path) will be bad for the rear
knee. I also heard that a Swiss medical article (which I couldn't
locate) reported that there were more rear knee injuries with
snowboarders that used a 0° angle or duck stance -- off course, it might also
be that duck stanced people do more dangerous tricks (or over-estimate their
skills :-).
However, there is also a good argument for using duck stance: it is easier (and
more natural) to bend deep through the knees in duck stance. You can easily try
this at home, try to bend deep through your knees when both feet are pointing a
little bit forward and try it again in a duck stance. Since bending through the
knees is crucial to good snowboarding, it might even be the case that duck
stance improves style and is more friendly to your knees and spine. I have had
off-piste lessons from three different snowboard guides in France, each of them
having taught snowboarding for more than 7 seasons and all of them used duck
stance. At least one of them used duck since he was getting knee problems with
a forward stance -- as I said, the opinions on duck stance are quite diverse!
Other arguments on duck stance are less convincing. A quick survey of the stance
angles of current professional freestyle snowboarders shows that about half of
them use duck stance and some people say the it is easier to ride backwards
(fakie) with duck stance, but this is quite debatable.
One word of warning though. Duck stance is bad for the rear knee when
your technique is wrong. Off course, this is true in general for any stance but
it happens often that people try to point their rear knee forward when standing
in duck stance for the first time. You can easily spot this by looking at your
knees when making a (frontside) turn, or when your rear knee gets tired very
soon. It is essential that you keep your lower body aligned with the board in
this stance and that both knees point in their natural direction -- do not
force your knees into unnatural angles!
Stance centering
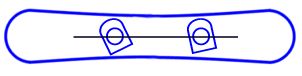
Stance centering means that your feet should always be centered and
aligned with respect to the width of your board. This is extremely
important -- I once had one of my bindings off-center and it took me at least a
month before I discovered why my turn completions were unstable. When both
bindings are off-center, it is not so bad, but your turns will be inconsistent:
short turns on one side, forced turns on the other. A centered stance on
the other hand, leads to balanced turns and reduces the likelihood of catching
an edge when the board is pointed down the fall line..
The feet should be centered on the board -- this normally corresponds
with the disks on the bindings being centered but that doesn't have to be the
case. The best way to center the bindings is to put on your boots and bindings
on and feel very carefully where your feet are with respect to the binding
discs. Than, you can shift both bindings to center your feet on the board. Some
bindings have a fixed heel cup (Burton, Flow) and you need to shift the discs.
Other bindings have a heel cup which can be shifted forward or backward in
order to change the position of the boot.
 (drawings by: hot
snowboards)
(drawings by: hot
snowboards)
Stance width

The stance width is the distance between the centers of both bindings.
The stance width depends mostly on your height. The width should be roughly
equal to the distance from the middle of your kneecap to the ground, or about 1
inch (2.5 cm) more than the width of your shoulders. If you have chosen the
right board for your length (a board up to your chin!), this should be about
the same as distance between the default holes on the board.
The stance width has quite some effect on your board control and you can feel
even small differences in the stance width. A wider stance will give more
stability but makes the turn transitions harder. The reverse holds for a
smaller stance width. A wide stance is sometimes used by freestyle snowboarders
while a narrow stance is often seen on alpine boards. My personal advice is to
use your natural stance and to stick with the default holes on the board (if
you have bought a snowboard that fits you well!). I recommend not to vary too
much with the stance width unless you're an expert snowboarder.
The following table gives a rough indication of a good stance-width relative to
your height for normal boards. Use the lower bounds when your board is shorter
than 1.55 m.
(source: Snow
Board Canada magazine).
|
height (m) |
height (feet) |
width (inch) |
|
< 1.54 |
< 5'1" |
17-18 |
|
1.56 to 1.62 |
5'2" to 5'4" |
18-19 |
|
1.65 to 1.72 |
5'5" to 5'8" |
19-20 |
|
1.75 to 1.82 |
5'9" to 6' |
20-21 |
|
> 1.82 |
> 6' |
22-23 |
Here are some formulas to determine the stance width.
(source:
hot snowboards).
|
|
normal board |
alpine board |
|
male |
0.29 * height |
0.275 * height |
|
female |
0.27 * height |
0.265 * height |
Stance offset (or setback
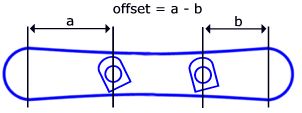 )
)
The stance offset is the distance between the center of both bindings and
the logical center of your board. The logical center normally
corresponds to the center of the effective edge of the board. The center of the
effective edge is determined by taking the middle between the widest points
of the board at the nose and the tail ( i.e. not the middle between the nose
and tail of the board itself). The center of the bindings is determined by
taking the middle between the centers of both bindings. Here is a quick way to
determine the offset: measure the distance between the widest point at the nose
with the center of the front binding (a), measure that distance for the
rear too (b), and finally subtract those values (a-b) to get the
offset.
An even better way to determine the offset is to take advantage of the default
settings of the manufacturer. Normally the default holes are marked with their
stance width and stance offset. If this is the case, you can check the stance
width by measuring the distance beween the centers of the default holes. If
this is correct, you take the middle between both holes. From here, you measure
the default stance offset in the direction of the nose of your board. Now you
mark this point on your board with some tape or a pencil. This point is the logical
center of your board. With this point, you can now easily determine the
stance offset when using other holes on your board. This method is better than
the previous method, since modern boards sometimes use asymetrical flex
patterns which leads to a difference between the center of your effective edges
and the logical center of the board.
Now, the best way to set your stance offset (and stance width for that matter)
is to look at the reference manual of your board. Unfortunately, not all
manufacturers include one with their boards but if you have one, you normally
find large tables with all the possible stance offsets (and widths) available
on your board.
First of all, the offset should never be negative (i.e. the bindings should
never be centered forward on the board). With a centered stance, the
offset is zero. The board turns easily and you will have a good board control.
If you stick to the default holes of the manufacturer, the bindings are
normally set a bit backward on the board with an offset of about 1 inch (or
25mm) which is also called setback. The board will behave as if it
has a shorter and stiffer tail. This means you can make more aggressive turns,
ollie higher, and float more easily in the powder. People that ride a lot of
powder sometimes even use a 2 inch setback to ride the powder in a more relaxed
stance without worrying about a nosedive into the deep snow. However, setting
the bindings too far backwards makes the turn initiation harder and should thus
not be used by less advanced snowboarders.
Stance kind
The stance kind determines which leg is in front. If it is your left
foot, you are regular and otherwise you are goofy. About 80% of
the snowboarders are regular. Using the right stance kind makes it much easier
to learn snowboarding. You can only know your stance kind by trying it out on
the first day of snowboarding -- you will feel the difference immediately! A
quick test will give you a good hint before renting the snowboard for the first
time. Try to slide on the kitchen floor with your socks; the foot that is in
front normally corresponds with your stance.
What setups do the professionals use?
The following tables use degrees for angles and inches (yuk!) for distances. The
table entries are sorted on the back angle, front angle, and the name.
A lot of setups of professional (freestyle) snowboarders. Source:
Onboard buyer's guide (2001).
|
name |
stance angles |
stance width |
stance offset |
stance category |
|
Jason Brown |
|
20 |
|
duck |
|
Stephan Babler |
+15/-13 |
21 |
0 |
duck |
|
Gian Simmen |
+15/-12 |
21 |
|
duck |
|
Matt Hammer |
+18/-12 |
21.5 |
|
duck |
|
Danny Kass |
+12/-9 |
21 |
0 |
duck |
|
Jamie Parker |
+15/-9 |
22.75 |
|
duck |
|
Gabe Taylor |
+18/-9 |
21 |
|
duck |
|
Eddie Wall |
+18/-6 |
21.75 |
0 |
duck |
|
Andrew Crawford |
+21/-6 |
22 |
1 |
duck |
|
Nic Drago |
+21/-6 |
19.5 |
|
duck |
|
Janny Meyen |
+21/-6 |
21 |
|
duck |
|
Katrina Voutilainen |
+21/-6 |
19.5 |
|
duck |
|
Kyle Clancy |
+25/-5 |
22 |
1 |
duck |
|
Ali Goulet |
+29/-5 |
19 |
0 |
duck |
|
Vic Lowrence |
+30/-3 |
21 |
1 |
duck |
|
Natasza Eva Zurek |
+18/ 0
|
20 |
1 |
forward |
|
Raam Clampert |
+18/ 0 |
20.25 |
0 |
forward |
|
Kim Cristiansen |
+18/ 0 |
23 |
|
forward |
|
Xaver Hoffman |
+21/ 0 |
20.5 |
1 |
forward |
|
Jaime Macleod |
+21/ 0 |
19 |
|
forward |
|
Line Ostvolo |
+30/ 0 |
20 |
4 |
forward |
|
Barret Christy |
+18/+3 |
18.5 |
1.5 |
forward |
|
Amy Johnson |
+24/+3 |
19.5 |
1.5 |
forward |
|
Jesse Burtner |
+25/+3 |
21 |
1.5 |
forward |
|
Shaun White* |
+15/+4 |
20 |
|
forward |
|
Ross Powers** |
+21/+9 |
21 |
0 |
forward |
|
Tricia Byrnes |
+21/+12 |
19.5 |
|
forward |
*) The stance angles of Shaun White are different on the Burton site: +15/-6.
Setups of famous big mountain riders. (I would like to extend this table
with more riders -- please send me a mail if you know the stance angles of good
freeriders, like Jeremy Jones, Gilles Voirol, Ashley Call, ...).
|
name |
stance angles |
stance width |
stance offset |
stance category |
source |
|
Victoria Jealouse |
+21/ 0 |
|
|
forward |
|
|
Axel Pauporte |
+27/ 0 |
20.5 |
|
forward |
|
|
Jim Rippey |
+21/+6 |
|
|
forward |
|
|
Johan Olofsson |
+27/+6 |
|
|
forward |
|
|
Craig Kelly |
+27/+9 |
|
|
forward |
|
|
Stephen Koch |
+40/+30 |
|
|
alpine |
The setups of the US40/Santa Cruz boardercross team. Source:
US40 (2001).
|
name |
stance angles |
stance width |
stance offset |
stance category |
|
Cri Maierhofer |
+30/+5 |
20.3 |
|
forward |
|
Ine Pötzl |
+33/+5 |
19.1 |
|
forward |
|
Fabo Bonacina |
+27/+6 |
21.1 |
|
forward |
|
Berti Denervaud |
+24/+9 |
21.1 |
|
forward |
|
Tor Bruserud |
+33/+9 |
20.7 |
|
forward |
|
Philippe Conte |
+27/+15 |
20.7 |
|
forward |
Setups of the Burton 2002 team (mostly freestyle). Source:
Burton (2002).
|
name |
stance angles |
stance width |
stance offset |
stance category |
|
Shaun White* |
+15/-6 |
20 |
|
duck |
|
Romain de Marchi |
+24/-6 |
|
|
duck |
|
David Carrier Porcheron |
+15/-3 |
|
|
duck |
|
Stefan Gimple |
+18/-3 |
|
|
duck |
|
Trevor Andrew |
+15/ 0 |
|
|
forward |
|
Jussi Oksanen |
+15/ 0 |
|
|
forward |
|
Keir Dillon |
+18/ 0 |
|
|
forward |
|
Gigi Ruf |
+18/ 0 |
|
|
forward |
|
Natasha Eva Zurek |
+18/ 0 |
20 |
1 |
forward |
|
Victoria Jealouse |
+21/ 0 |
|
|
forward |
|
Dave Downing |
+18/+3 |
|
|
forward |
|
Anne Molin Kongsgaard |
+27/+3 |
|
|
forward |
|
Nicola Thost |
+27/+3 |
|
|
forward |
|
Shannon Dunn |
+18/+6 |
|
|
forward |
|
Jim Rippey |
+21/+6 |
|
|
forward |
|
Johan Olofsson |
+27/+6 |
|
|
forward |
|
Terje Haakonsen |
+21/+9 |
21 |
|
forward |
|
Ross Powers |
+21/+9 |
21 |
0 |
forward |
*) The stance angles of Shaun White are different in the Onboard buyer's guide:
+15/+4.
The setups of the (freestyle (railslide!)) Forum team members. Source:
Forum winter collection folder (2000-2001).
|
name |
stance angles |
stance width |
stance offset |
stance category |
|
Nathan Bozung |
|
22 |
|
duck |
|
Chris Dufficy |
+24/-18 |
23 |
|
duck |
|
JP Walker |
+18/-15 |
21.75 |
1.5 |
duck |
|
Jeremy Jones* |
+18/-15 |
22 |
|
duck |
|
Peter Line |
+20/-15 |
20.5 |
|
duck |
|
Devun Walsh |
+29/-15 |
21 |
|
duck |
|
Mike Page |
+26/-8 |
22.5 |
|
duck |
|
Joni Malmi |
+17/-9 |
|
|
duck |
|
Bjorn Leines |
+18/-9 |
21.75 |
|
duck |
|
Mikko Sjoblom |
+27/-9 |
20.5 |
|
duck |
*) This is not the same Jeremy Jones who descends steep slopes in Alaska. The
latest Optigrab movevie (TB10)
has a short shot of the board setup of the "Rossignol" Jeremy Jones,
which shows a (goofy) forward stance, around +21°/+6°.
As a dutchman, I couldn't resist to give the setups of the Dutch (freestyle)
Doritos team. Source:
Ultimate Snowboarding site (2001) &
Deep magazine (2001).
|
name |
stance angles |
stance width |
stance offset |
stance category |
|
Tijs Goossens |
+21/-15 |
23 |
|
duck |
|
Marc van der Meer |
+27/-12 |
|
|
duck |
|
Jody Koenders |
+20/-4 |
22.5 |
|
duck |
|
Bo Schenk |
+12/ 0 |
20.7 |
|
forward |
|
Anne Fleur Eiff |
+18/ 0 |
19.9 |
|
forward |
|
Erik van Kammen |
+24/+3 |
20.7 |
|
forward |
|
Marc v/d Meer (half-pipe) |
+27/+3 |
|
|
forward |
|
Luc Daniel van Ommen |
+15/+6 |
|
|
forward |
|
Patrick van der Graaff |
+21/+6 |
20.7 |
2.4 |
forward |
The setups of some French snowboard guides that I had lessons from. Allthough
the angles seem quite extreme, you have to keep in mind that these people spend a
lot of time on their snowboards in extremely versatile terrain and
conditions. (2000 - 2001).
|
name |
stance angles |
stance width |
stance offset |
stance category |
|
Hughes, La Plagne |
+20/-20 |
|
|
duck |
|
Valerie, Les Deux Alpes |
+15/-15 |
|
0 |
duck |
The average stances of professional riders from different snowboarding
disciplines (might be a bit outdated). Source:
Transworld Snowboarding.
|
discipline |
stance angles |
stance width |
stance offset |
stance category |
|
SlopeStyle |
+12/ 0 |
21.3 |
1 |
forward |
|
Halfpipe |
+17/+2 |
20.7 |
0.5 |
forward |
|
Freeride |
+22/+7 |
21.1 |
1.7 |
forward |
|
Slalom |
+49.2/+47.2 |
17 |
0.4 |
alpine |
|
Super G |
+49.4/+47.4 |
17.2 |
0.45 |
alpine |
|
GS |
+49.6/+47.6 |
17 |
0.44 |
alpine |
Recommended stance angles from the Snow
Board Canada magazine.
|
style |
stance angles |
stance width |
stance offset |
stance category |
|
Halfpipe |
+10/+5 |
|
|
forward |
|
Park |
+15/+5 |
|
|
forward |
|
Beginner |
+25/+15 |
|
|
forward |
|
Freeride |
+25/+15 |
|
|
forward |
|
Extreme |
+25/+15 |
|
|
forward |
|
Freecarving |
+45/+35 |
|
|
alpine |
|
Racing, asymetrical |
+50/+45 |
|
|
alpine |
|
Racing, symetrical |
+65/+60 |
|
|
alpine |
Links
Everything about setting up and buying your gear:
-
How to
determine your stance, solid advice.
-
Snowboard buyer's guide,
a must-read before you buy a snowboard.
-
Choose the perfect
board, more good advice before you buy a snowboard.
-
Snowboard faq, lot's of answers on lot's of
questions.
Alpine boarders:
-
Hot snowboards, good pages with lots
of technical advice.
-
Bomber online, a forum for carvers.
Snowboard style and technique:
-
Extreme carving, inspiring site
with excellent advice on snowboard technique.
-
Cern skiclub,
a great page for learning snowboarding and advanced snowboard techniques.
Sanity: why you absolutely need to wear wristguards and why a helmet is a
good idea too:
-
Snowboarding injuries, a
great overview with good advice -- a must read!
-
Snowboarding injuries,
statistics.
Good odds
And, even better, your chances of dying as a result of one of those [snowboard]
accidents, you’ll be pleased to hear, is about one in 5,000,000. In other
words, you’re twenty times more likely to be struck by lightning. Tell you
what, though, if you’re not chasing ‘mortuary air’ you’ll be fine.
Just stay out of the next twenty electrical storms...! (Source:
280north)
![]()
![]()